Additional target-support functions can be added to, and removed from, SEGGER Embedded Studio with packages.
A SEGGER Embedded Studio package is an archive file containing a collection of target-support files. Installing a package involves copying the files it contains to an appropriate destination directory and registering the package with SEGGER Embedded Studio's package system. Keeping target-support files separate from the main SEGGER Embedded Studio installation allows us to support new hardware and issue bug fixes for existing hardware-support files between SEGGER Embedded Studio releases, and it allows third parties to develop their own support packages.
Installing packages
Use the Package Manager to automate the download, installation, upgrade and removal of packages.
To activate the Package Manager:
- Choose Tools > Manage Packages.
In some situations, such as using SEGGER Embedded Studio on a computer without Internet access or when you want to install packages that are not on the website, you cannot use the Package Manager to install packages and it will be necessary to manually install them.
To manually install a package:
- Choose Tools > Manually Install Packages.
- Select one or more package files you want to install.
- Click Open to install the packages.
Choose Tools > Show Installed Packages to see more information on the installed packages.
The Package Manager window will remove manually installed packages.
The package manager
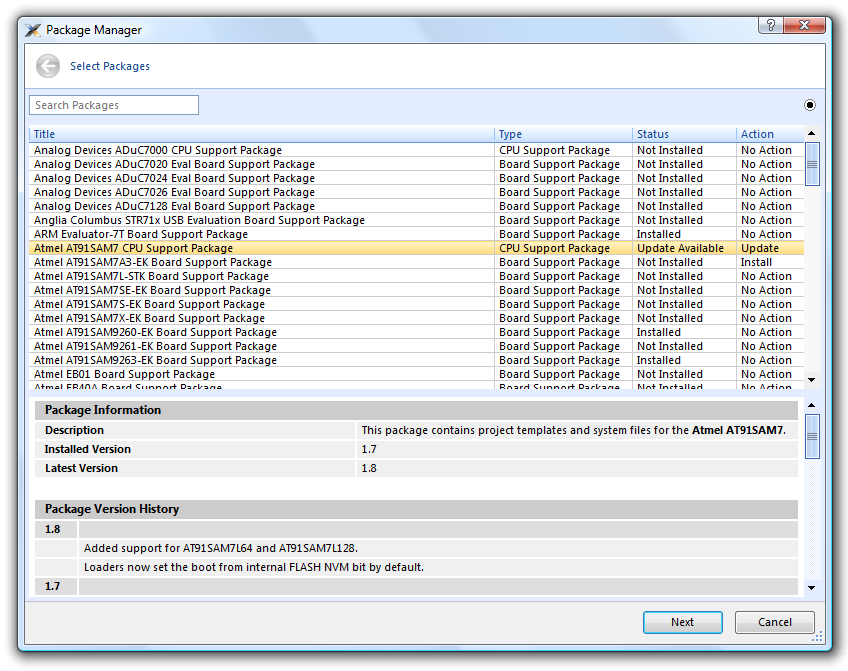
The Package Manager manages the support packages installed on your system. It lists the available packages, shows the installed packages, and allows you to install, update, reinstall, and remove them.

To activate the Package Manager:
- Choose Tools > Manage Packages.
Filtering the package list
By default, the Package Manager lists all available and installed packages. You can filter the displayed packages in a number of ways.
To filter by package status:
- Click on the disclosure icon near the top-right corner of the dialog.
- Use the pop-up menu to choose how to filter the list of packages.
The list-filter choices are:
- Display All — Show all packages irrespective of their status.
- Display Not Installed — Show packages that are available but are not currently installed.
- Display Installed — Only show packages that are installed.
- Display Updates — Only show packages that are installed but are not up-to-date because a newer version is available.
You can also filter the list of packages by the text in the package's title and documentation.
To filter packages by keyword:
- Type the keyword into the Search Packages box at the top-left corner of the dialog.
Installing a package
The package-installation operation downloads a package to $(PackagesDir)/downloads, if it has not been downloaded already, and unpacks the files contained within the package to their destination directory.
To install a package:
- Choose Tools > Package Manager and set the status filter to Display Not Installed.
- Select the package or packages you wish to install.
- Right-click the selected packages and choose Install Selected Packages from the shortcut menu.
- Click Next; you will be see the actions the Package Manager is about to carry out.
- Click Next and the Package Manager will install the selected packages.
- When installation is complete, click Finish to close the Package Manager.
Updating a package
The package-update operation first removes existing package files, then it downloads the updated package to $(PackagesDir)/downloads and unpacks the files contained within the package to their destination directory.
To update a package:
- Choose Tools > Package Manager and set the status filter to Display Updates.
- Select the package or packages you wish to update.
- Right-click the selected packages and choose Update Selected Packages from the shortcut menu.
- Click Next; you will see the actions the Package Manager is about to carry out.
- Click Next and the Package Manager will update the package(s).
- When the update is complete, click Finish to close the Package Manager.
Removing a package
The package-remove operation removes all the files that were extracted when the package was installed.
To remove a package:
- Choose Tools > Package Manager and set the status filter to Display Installed.
- Select the package or packages you wish to remove.
- Right-click the selected packages and choose Remove Selected Packages from the shortcut menu.
- Click Next; you will see the actions the Package Manager is about to carry out.
- Click Next and the Package Manager will remove the package(s).
- When the operation is complete, click Finish to close the Package Manager.
Reinstalling a package
The package-reinstall operation carries out a package-remove operation followed by a package-install operation.
To reinstall a package:
- Choose Tools > Package Manager and set the status filter to Display Installed.
- Select the package or packages you wish to reinstall.
- Right-click the packages to reinstall and choose Reinstall Selected Packages from the shortcut menu.
- Click Next; you will see the actions the Package Manager is about to carry out.
- Click Next and the Package Manager will reinstall the packages.
- When the operation is complete, click Finish to close the Package Manager.